

Current Project Status
The file upload, download, and delete functions have been implemented and the project SIM 3.0 remains still on schedule.
The following sections provide a short analysis of the file integration process and its key components. Let’s start with an overview of the used canister structure in the project.
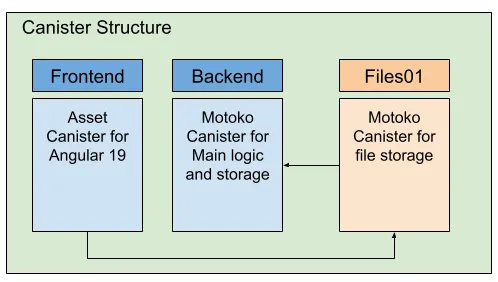
Canister Structure
The current canister structure consists of three main canisters: a frontend canister, a backend canister and a file canister. The backend and file canisters are built on Motoko. We have implemented separate file canisters to enable the creation of additional canisters as needed, in anticipation of reaching maximum canister capacity.

Concept of File Storage
There are two ways to store files on the Internet Computer. The first variant is by using an asset canister, which is how files are stored in the frontend canister. This method is well-suited for public websites where all files are available for public download through the browser.
The second approach involves storing the files in a Motoko based canister. This is what we are currently utilizing. Due to a 2 MB message size limit, for up and download, we cannot upload files exceeding this size. Therefore, we must implement a chunking mechanism. This mechanism splits larger files into smaller chunks for separate uploading.
Once this obstacle is overcome, we can proceed by storing the file chunks in a Map structure, along with an index and relevant file metadata.
The following code block illustrates a helpful structure for the files canister. Motoko utilizes a stable hash Map structure, and the chunks are stored in a vector, which is a memory-efficient resizable array that allows faster addition of new chunks.
var simFiles : Map.Map<FileId, File>;
public type FileId = Text;
public type FileChunk = {
    chunk : Blob;
    index : Nat;
  };

public type File = {
    name : Text;
    chunks: Vector.Vector<FileChunk>;
    totalSize : Nat;
    fileType : Text;
  };
In our case, we split the files on the client into chunks of 1 MB. But first we need to read the file into an ArrayBuffer. This is basically done by a JavaScript method like:
private readFileAsArrayBuffer(file: File): Promise<ArrayBuffer> {
    return new Promise((resolve, reject) => {
      const reader = new FileReader();
      reader.onload = () => resolve(reader.result as ArrayBuffer);
      reader.onerror = () => reject(reader.error);
      reader.readAsArrayBuffer(file);
    });
  }
With the ArrayBuffer we can divide the file into chunks of the desired file size. Each chunk can then be uploaded to the files canister. The files canister contains a dedicated uploadFile function to manage the upload process.
The file Id represents the unique identifier of the file which is generated on the client side. We use uuidv4() to create a unique file Id.
When uploading a chunk, we check if an unique file already exists in the Map. If it doesn’t exist, we create a new Map entry for the file and insert the first chunk. If the file Id is present, we add a new chunk to the corresponding file in the vector.
This process allows us to transfer all the chunks of a file to the canister by uploading them in sequence.

We have implemented a permission check before the upload happens using an authenticated request. This method allows us to specify which user or group has the authorization to upload a file to a task. Overall, this gives us control over who can upload and download files. In our case Internet Identity is used for authentication and this authenticated user does authenticated requests against the backend and file canister.
Two Internet Computer’s features enable this functionality. The Internet Identity authenticates the user, while with inter-canister calls we can verify the user’s permissions for uploading files to a task. This inter-canister call is necessary to double-check the user’s upload permissions. The main logic and data (task, user, …) are stored on the backend canister and only files have their own separated canisters.
Inter-canister calls are also used to store meaningful messages to the task after successfully uploading the file to the canister. Remember, all data is stored into the backend canister. This message details the file, the uploader, and the upload timestamp.
Acquire a File List for each Task
The Map.toArray(simFiles) function provides a straightforward way to retrieve a list of files for each task. This function is part of the Map package and can be easily used.
All file requests are protected by a function that verifies user permissions using inter-canister calls. These inter-canister calls are also protected by permission checks to prevent unauthorized users from requesting data.
Retrieve a File Using its Unique Identifier
Downloading a file requires additional effort, unlike the straightforward process of retrieving a file list.
Files on the Internet Computer are not stored on a server’s file system like in Web 2. Instead, they are divided into chunks and stored in a data structure of your choice. Therefore, before downloading and assembling the file on the client, we first need to determine the number of chunks required by the target file.
The general procedure for downloading a file involves the following steps:
- Retrieve the file’s metadata and the number of chunks.
- Download each chunk to the client based on the stored index.
- Combine the downloaded chunks into a single file.
- Initiate a click event to prompt the browser for saving the file locally.
The following snippet provides an example of how this could work, where the chunks array contains all downloaded chunks. There are multiple approaches to achieve this, based on the frontend framework you are utilizing.
const fileBlob = new Blob(chunks, { type: fileMeta.fileType });
const url = URL.createObjectURL(fileBlob);

const link = document.createElement('a');
link.href = url;
link.download = fileMeta.fileName || 'download';
link.click();
Contrast between Web2 and Web3 Methodologies
Let’s take a look at how Web 2 and Web 3 differ in terms of uploading, storing, downloading data and pricing. My key takeaways are attached.

Web 2 allows for straightforward whole file uploads and file size limitations can be readily bypassed through various web server configurations. Cloud computing in general offers a virtually limitless amount of storage capacity.
The Internet Computer imposes limits (2 MB) on both upload and download message sizes. Additionally, the amount of data that can be stored within a canister is capped at 4 GB. This applies to the 64-bit wasm version since Motoko 0.14.4 which is available since dfx version 0.26.

In Web 2 storing files involves both the web server’s file system and a database record. This dual approach facilitates search and retrieval but necessitates managing two separate components.
The Internet Computer, within the Web 3 environment, restricts data storage to a singular component, such as a Map, which can be used to store file data.This simplifies file maintenance, particularly when deleting it from the canister. It eliminates the need to double-check that the file is removed from both the file system and the database.

Web 2 simplifies file downloads, allowing you to download the desired file as a stream in your preferred backend language.
The Internet Computer requires to manage message size and client-side assembly.

Lastly, this article also explores the economic side of on-chain storage, for instance, what it actually costs to store 1 GB of data on the Internet Computer.
The Internet Computer charges approximately 5 USD per GB per year for storing data in a canister, regardless of whether you’re using heap memory or stable memory. In our case we’ve opted to utilize the heap memory.
Although the cost is significantly higher than traditional cloud storage, it has clear advantages. The Internet Computer offers:
- Decentralization, with data being tamper-proof and replicated by default;
- Integrated pricing that covers both computation and storage, billed in cycles;
- A perfect fit for applications that require full on-chain data ownership and verifiability.
Even though the raw cost per GB doesn’t compete with cloud giants yet, the Internet Computer excels in trustless hosting, data integrity, and built-in security. Features that are either costly or complex to achieve with traditional cloud providers. Keep that in mind!
Familiarize yourself with this project and understand how to integrate a file storage solution.


